Grid View Sitemap For Blogger With Thumbnails / Images
Sitemap is a good way to showcase all your posts and help visitors find every post in one place. By far I have shared two types of sitemaps, first is simple list of all posts with label names and other with grid view but names of posts only, so in this post I will teach you how to create a grid view sitemap with thumbnails. It is simple sitemap with all published posts and when a picture is hovered with mouse cursor it flips and show the name of respective post with its publish date and number of comments if any ! So its a impressive sitemap and you show try it once.
Here is a demo of the grid view sitemap with thumbnails/images for blogger blog.
Steps To Add Grid View Sitemap For Blogger With Thumbnails
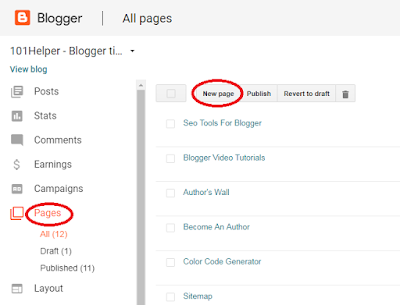
Step 1: Go to Blogger > Pages and click on New Page.
Step 2: Switch to HTML view.
Step 3: Copy below code and replace https://101helper.blogspot.com with your blog link
<style type="text/css">
.grid-sitemap {
overflow: hidden;
position: relative;
height: 565px;
margin: 20px 0 40px 0;
}
.grid-sitemap iframe {
display: block;
width: 100%;
height: 680px;
margin-top: -115px;
margin-left: -5px;
}
</style>
<div class="grid-sitemap">
<iframe src="https://101helper.blogspot.com/view/flipcard"></iframe>
</div>
Step 4: Give a title to your page and Publish it and its done
Similar Posts:
● How To Add A Html Sitemap Page In Blogger
● How To Add Advanced Sitemap In Blogger
I hope you like this post, if not and you have a good opinion, tell me in comments. Thanks for visiting 101helper. Don't forget to share.


No comments